
| 일 | 월 | 화 | 수 | 목 | 금 | 토 |
|---|---|---|---|---|---|---|
| 1 | 2 | 3 | 4 | 5 | 6 | 7 |
| 8 | 9 | 10 | 11 | 12 | 13 | 14 |
| 15 | 16 | 17 | 18 | 19 | 20 | 21 |
| 22 | 23 | 24 | 25 | 26 | 27 | 28 |
| 29 | 30 | 31 |
Tags
- MySQL
- php
- 웹 개발
- lord of sql injection
- 문제 풀이
- file upload
- XSS
- csrf
- 증적 사진
- ISMS-P
- FridaLab
- sql injection
- 세션
- sql injection point
- 웹개발
- 로그인페이지
- ISMS
- Los
- 웹 해킹
- 보고서
- cookie 탈취
- 보안 패치
- JS
- 게시판 만들기
- 모의해킹
- 뇌피셜
- Error based sql injection
- union sql injection
- CTF
- blind sql injection
Archives
- Today
- Total
Backouts_ Logbook
게시판 만들기 #2 (게시글 작성) 본문
게시판 만들기
게시글 작성기능
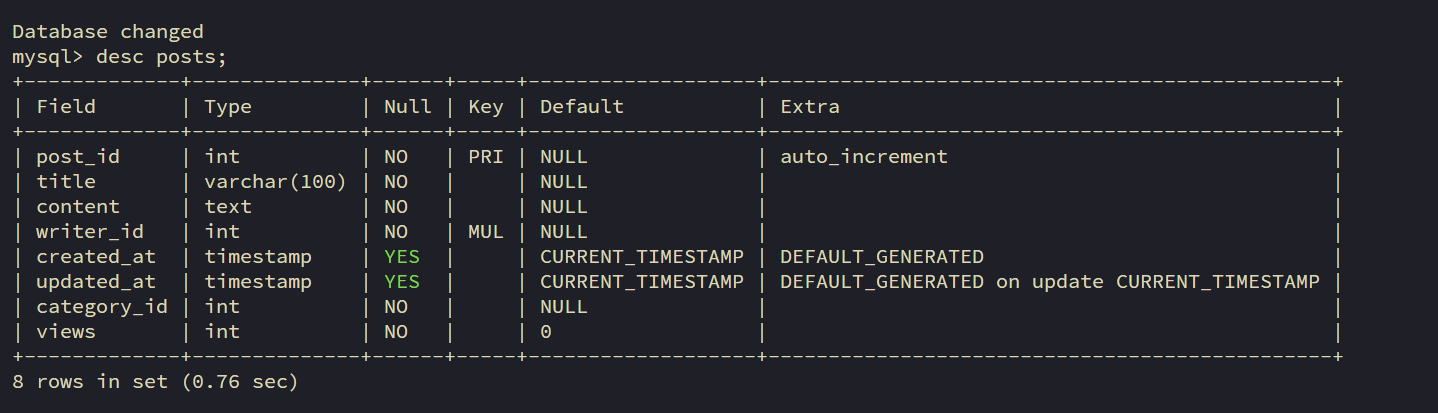
DB생성
포스트를 저장할 posts 테이블을 생성합니다.
create table posts (
    post_id int auto_increment primary key,
    title varchar(100) not null,
    content text not null,
    writer_id int not null,
    created_at timestamp DEFAULT CURRENT_TIMESTAMP,
    updated_at timestamp DEFAULT CURRENT_TIMESTAMP ON UPDATE CURRENT_TIMESTAMP,
    category_id int not null,
    views int not null DEFAULT 0,
    FOREIGN KEY (writer_id) REFERENCES users(id)
);
forum.php 수정
<link rel="stylesheet" href="/forum/css/write-post.css">
<script src="/forum/script/write_post.js" defer></script>
<script src="/forum/script/write_submit.js" defer></script>

<button class="write-post" onclick="writePost()">게시글 작성하기</button>
기능을 만드는데 필요한 js와 css를 불러옵니다.
게시글 작성하기 버튼을 클릭했을 때 writePost() 함수가 실행하도록 변경했습니다.
write_post.css
.write-form {
  height: 100%;

  display: flex;
  flex-direction: column;
  justify-content: center;
  align-items: center;
}

.title-wrap {
  margin-bottom: 2rem;
  width: 80%;
  height: 10%;
}

.category-select {
  margin-bottom: 0.6rem;
  text-indent: 30px;
  width: 100%;
  height: 50%;

  font-size: medium;

  border-bottom: 1px solid rgba(200, 200, 200, 0.3);
  background-color: transparent;
  padding: 5px;
  border-radius: 10px 10px 0 0;
}

.title-input {
  padding: 13px 30px 11px;
  width: 100%;
  height: 50%;

  font-size: medium;
  font-weight: 700;

  background-color: rgba(200, 200, 200, 0.3);
  border-radius: 10px;
}

.content-input {
  resize: none;

  padding: 20px 30px;
  margin-bottom: 2rem;
  width: 80%;
  height: 60%;

  font-size: medium;

  background-color: transparent;

  border: 1px solid rgba(200, 200, 200, 0.3);
  border-radius: 2px;
}

.submit-btn {
  width: 20%;
  height: 5%;

  border-radius: 6px;

  color: #4d3f29;
  font-weight: 600;
  background-color: rgba(200, 176, 141, 0.5);
  transition: background-color 0.3s ease, scale 0.3s ease;
}

.submit-btn:hover {
  background-color: rgba(200, 176, 141, 0.7);
  scale: 1.05;
}
write_post.js
function writePost() {
  const postContainer = document.querySelector('.post-container');
  const write = document.querySelector('.post-title');
  const categriesAll = document.querySelectorAll('.category');
  const postContent = document.querySelector('.post-content');

  // 태그 생성
  const form = document.createElement('form');
  form.classList.add('write-form');

  const titleWrap = document.createElement('div');
  titleWrap.classList.add('title-wrap');

  const categorySelect = document.createElement('select');
  categorySelect.setAttribute('name', 'categoryId');
  categorySelect.classList.add('category-select');

  categriesAll.forEach((categoryTag) => {
    const option = document.createElement('option');
    option.value = categoryTag.getAttribute('data-category-id');
    option.textContent = categoryTag.innerHTML;
    categorySelect.appendChild(option);
  });

  const titleInput = document.createElement('input');
  titleInput.setAttribute('type', 'text');
  titleInput.setAttribute('name', 'title');
  titleInput.setAttribute('placeholder', '제목을 입력해 주세요.');
  titleInput.setAttribute('maxlenght', '30');
  titleInput.classList.add('title-input');

  titleWrap.appendChild(categorySelect);
  titleWrap.appendChild(titleInput);

  const contentInput = document.createElement('textarea');
  contentInput.setAttribute('name', 'content');
  contentInput.setAttribute('placeholder', '내용을 입력해 주세요.');
  contentInput.classList.add('content-input');

  const submitBtn = document.createElement('button');
  submitBtn.setAttribute('onclick', 'write_submit(event)');
  submitBtn.classList.add('submit-btn');
  submitBtn.textContent = '등록하기';

  // form에 태그 추가
  form.appendChild(titleWrap);
  form.appendChild(contentInput);
  form.appendChild(submitBtn);

  // 실제 화면에 추가
  postContent.innerHTML = '';
  postContent.appendChild(form);
  postContainer.classList.add('on');
  write.innerHTML = '게시글 작성';
}
게시글 작성하기 버튼을 누르면 자바스크립트로 태그들을 생성해서 post-content에 추가하는 코드입니다.
classList.add : 태그에 클래스를 추가해 주는 메서드입니다.
setAttribute(name, value) : 태그에 요소를 추가해 주는 메서드입니다. ex) placeholder, name, onclick
textContent : 태그에 문자를 의미합니다. ex) <p> text </p>를 html이 아니라 문자열로 해석
innerHTML : 태그 안에 html을 의미합니다. ex) <p> text </p>를 p태그로 해석합니다.
appendChild(tag) : 태그에 자식을 추가합니다.
<form class="write-form">
    <div class="title-wrap">
    	<select name="categoryId" class="category-select">
        	<option value="1">공지사항</option>
            <option value="2">자유게시판</option>
            <option value="3">자료실</option>
        </select>
        <input type="text" name="title" placeholder="제목을 입력해 주세요." maxlenght="30" class="title-input">
    </div>
    <textarea name="content" placeholder="내용을 입력해 주세요." class="content-input"></textarea>
    <button onclick="write_submit(event)" class="submit-btn">등록하기</button>
</form>
자바스크립트 코드로 만들어진 html코드입니다.

write_submit.js
function write_submit(e) {
  e.preventDefault();

  const form = document.querySelector('.write-form');
  const url = '/forum/db/write_post.php';
  const formData = new FormData(form);
  fetch(url, {
    method: 'POST',
    body: formData,
  })
    // .then((res) => res.text())
    // .then((res) => console.log(res));
    .then((res) => res.json())
    .then((res) => {
      if (res.token) {
        if (res.result) {
          closePost();
        }
      } else {
        window.location.href = 'logout.php';
      }
    });
}
게시글 등록하기 버튼을 누르면 write_submit함수가 실행됩니다.
function write_submit(e) {
  e.preventDefault();
함수가 실행되면 태그를 클릭했을 때 발생하는 기본 이벤트를 제거합니다.
버튼을 클릭했을 때 submit이 발생하며 자동으로 새로고침되는 것을 방지합니다.
  const form = document.querySelector('.write-form');
  const url = '/forum/db/write_post.php';
  const formData = new FormData(form);
  fetch(url, {
    method: 'POST',
    body: formData,
  })
write_post.php에 게시글을 작성한 폼의 데이터를 포함시켜 요청을 보냅니다.
FormData는 name : value 쌍으로 이루어져 있습니다.
    .then((res) => res.json())
    .then((res) => {
      if (res.token) {
        if (res.result) {
          closePost();
        }
      } else {
        window.location.href = 'logout.php';
      }
    });
요청을 받았을 때 결과가 참이면 closePost() 함수로 컨테이너를 종료시킵니다.
close_post.js
function closePost() {
  const postContainer = document.querySelector('.post-container');
  const postContent = document.querySelector('.post-content');
  postContainer.classList.remove('on');
  postContent.innerHTML = '';
}
clostPost는 컨테이너의 클래스에서 on을 삭제해서 투명화를 시키고,
post-content의 innserHTML을 빈 문자열로 만들어서 생성되었던 태그들을 모두 삭제해 줍니다.
<?php
require_once("../../jwt_auth.php");
require_once("../../mysql.php");

if($token = Jwt_auth::auth()) {
    if(isset($_POST["categoryId"])) {
        $categoryId = $_POST["categoryId"];
        $title = $_POST["title"];
        $content = str_replace("\r", "", $_POST["content"]);
        $content = nl2br($content);
        // echo $content;

        if($title != "" && $content != "") {
            $user_id = $token->sub;
            $writer_id = runSQL("select id from users where user_id='$user_id'")->fetch_array()['id'];

            $sql = "insert into posts (category_id, title, content, writer_id) values ('$categoryId', '$title', '$content', '$writer_id');";
            runSQL($sql);

            echo json_encode(["result"=> true, "token" => true]);
        }else {
            echo json_encode(["result"=> false]);
        }

    }
}else {
    echo json_encode(["result"=> false, "token" => false]);
}
        $categoryId = $_POST["categoryId"];
        $title = $_POST["title"];
        $content = str_replace("\r", "", $_POST["content"]);
        $content = nl2br($content);
카테고리 id와 작성한 포스트의 제목, 텍스트를 변수에 넣습니다.
str_replace로 윈도우의 캐리지 리턴(\r)을 제거해 줍니다.
=> 윈도우에서만 사용되는 개행문자(\r\n)이므로 \r을 제거해서 \n으로 통일해 줍니다.
n12br은 개행문자에 <br / > 태그를 추가해 줍니다.
나중에 출력할 때를 위해서 <br / > 태그를 붙여줍니다.
=> 안녕하세요 \n을 안녕하세요 <br/>\n으로 변경해 줍니다.
         if($title != "" && $content != "") {
            $user_id = $token->sub;
            $writer_id = runSQL("select id from users where user_id='$user_id'")->fetch_array()['id'];

            $sql = "insert into posts (category_id, title, content, writer_id) values ('$categoryId', '$title', '$content', '$writer_id');";
            runSQL($sql);

            echo json_encode(["result"=> true, "token" => true]);
토큰의 sub에 저장되어있는 user_id(문자)를 이용해서 users 테이블에서 유저의 id(숫자)를 가져옵니다.
posts테이블에 row를 추가합니다.
posts테이블의 writer_id(FK)와 users테이블의 id(PK)는 참조관계입니다.
posts.writer_id = users.id
마무리
'웹 해킹 > 웹 개발' 카테고리의 다른 글
| 게시판 만들기 #4 (게시글 읽기) (0) | 2024.11.12 |
|---|---|
| 게시판 만들기 #3 (게시글 목록) (0) | 2024.11.12 |
| 게시판 만들기 #1 (0) | 2024.11.11 |
| 로그인 로직 구현하기(과제) (1) | 2024.11.04 |
| JWT로 로그인 구현하기 (2) | 2024.11.03 |
'웹 해킹/웹 개발' Related Articles
more

